
How to use The Hiking Club App

A purpose-built planning app for multi-day hikers to confidently create an itinerary that is inspiring and achievable.
CREATE YOUR CUSTOM ITINERARY IN 6 EASY STEPS
1. SET YOUR TRIP DETAILS
Click “Create New Itinerary” from the home screen and input your trip details, including:
Click to expand video for easier viewing
Description/Name of your itinerary
First date of your hike
Measurement (Imperial or Metric)
Speed
Total number of days on trail (hiking and rest/zero days)
Tip 1: You can edit these details anytime
Tip 2: Not sure what speed you/your group is? Read this blog.
Note: We’ve designed the app in such a way that you don’t need to choose a hiking direction. The app will detect the direction for each section in your route and calculate accurate trail stats.
Click to expand video for easier viewing
2. CHOOSE YOUR START LOCATION
There are 3 ways you can select a start location for your itinerary;
A checkered flag (popular start locations along the trail)
Any accommodation location
Pick anywhere on the map.
Recommendation: Set your start location as a checkered flag or an accommodation location for the most accurate trail stats
Tip 1: You can toggle off the checkered flags in the bottom right key if you don't want to see them while planning the rest of your itinerary.
Tip 2: If you want to change your start location, either select a new accommodation or checkered flag or, if you are using the ‘pick on the map’ feature, select “change” under “Start location” from the side panel and click a new position on the map.
Click to expand video for easier viewing
3. SELECT YOUR ACCOMMODATION
There are 2 ways to find accommodation locations within the app. Either:
use the search bar
zoom in on the map until you see bed, campsite or bivouac icons.
Click on the accommodation icon and select which night you will be staying there in the drop down menu (i.e Night 1, 2, 3 etc).
Tip 1: Click the bold black accommodation icons, not the blue icons in the underlying map.
Tip 2: If you can’t see accommodation icons, look for green/yellow bubbles with a number in it (i.e 5). This indicates there are 5 accommodation options in this area. Click on the coloured bubble and it will automatically zoom to display all 5 accommodation locations.
Tip 3: You can add a rest day by clicking on the same accommodation location again and selecting the next night from the drop-down (i.e. Night 2, then Night 3). When a second night is added to an accommodation location, the waypoint number shown above it will be for the second night, with the number of the first night not being visible on the map as it is hidden beneath it.
Note: If you want to add a rest day after you’ve entered all of your nights, please see the FAQ below ‘Can I add a rest day after I've finished creating my itinerary?’ for instructions on how best to do it.
Click to expand video for easier viewing
4. CHOOSE YOUR DESIRED ROUTES
There are three different route types to choose from:
Main trail (the default)
Alternative trails
Other trails to reach accommodation or transport locations
To change the route, click on the selected route (light blue) and a dark blue waymarker will be added to the route (i.e 1.1). Drag the waymarker to the route of your choice. Your hiking stats for that day will be automatically recalculated.
Tip #1: Ensure you have main, alternative, and other trails toggled in the bottom right key to see all route options.
Tip #2: The blue waymarkers with numbers indicate when you are diverting from the main trail and indicate to our model which route to take (i.e 3.1, 3.2, 3.3). These waymarkers are used to alter your route off the “main trail” and ensure that the hiking itinerary and associated stats are accurate. The blue waymarkers restart each day. Day 1 markers start with 0.1, 0.2…and end with 1 (Accomodation location) Day 2 markers start with 1.1, 1.2… and end with 2 (Accomodation location).
5. ADD TRANSPORT OPTIONS
Ensure the “transport” toggle is switched on. Purple dotted lines will appear on your map.
Click on the selected route (light blue). A waypoint will be added to the route (i.e 1.1). Drag the pin to the transport option of your choice. Your hiking stats for that day will be automatically recalculated.
Tip: For longer transport routes (i.e bus or train), you may need to add multiple pins, as there may be bus/train stops options along the route. Therefore continue dragging the pins along your intended transport route until it is fully highlighted.
Click to expand video for easier viewing
Click to expand video for easier viewing
6. CHOOSE YOUR FINISH LOCATION
There are 3 ways you can select a finish location for your itinerary;
A checkered flag (popular finish locations along the trail)
Any accommodation location
Pick anywhere on the map.
Recommendation: Set your finish location as a checkered flag or an accommodation location for the most accurate trail stats
Tip 1: You can toggle off the checkered flags if you don't want to see them while planning the rest of your itinerary.
Tip 2: If you want to change your finish location, either select a new accommodation or checkered flag or, if you are using the ‘pick on the map’ feature, select “change” under “finish location” from the side panel and click a new position on the map.
FAQs

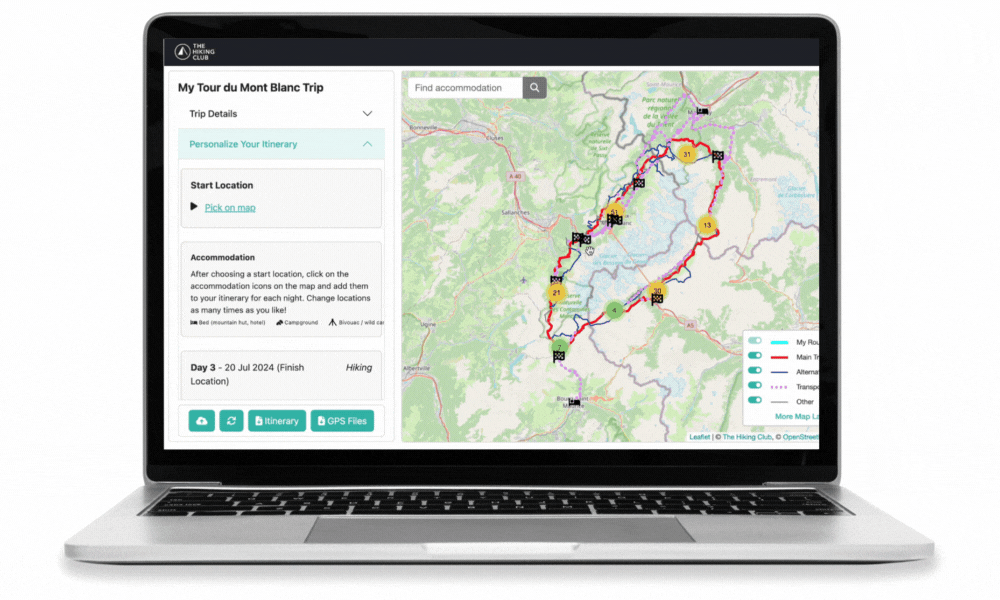
If you’d like to restart your itinerary and remove all route, accommodation and transport details, click on the “refresh” button in the bottom left panel. [See image]
All of the ‘Trip Details’ are editable so you can change your start date, speed and number of days here.
If you’d like to create another version, go back to the home screen and click “Create Itinerary”. You are able to create up to 5 draft itineraries within the app.

Click on 'Step 1: Trip Details', then select the other measurement type and then return to your trail stats panel by clicking on 'Step 2: Personalize Your Itinerary' and the trail stats will refresh.

You can add a rest day that is during your hike. I.e Night 4 and 5 in the stay accommodation. You can add a pre-hike accommodation by selecting the property as your ‘start location’ and post-hike accommodation by selecting it as your ‘finish location’.
Hotel or vacation rental: For the bigger villages along the trail with multiple accommodation options, we’ve included a range of properties that cater to different preferences and budgets. When we haven’t included all the options, we’ve added a generic accommodation symbol (🏠) near the village center that you can select. If is a hotel that is missing from our map, please email us the name to info@thehiking.club and we will add it. If it is a vacation rental (ie: Airbnb property), we won’t be adding those in due it not being a typical accommodation style chosen, and the huge number available in some villages will create too much clutter on the map.
Campground: If you believe we are missing a campground, or refuge that allows camping on their property, please email us the name and we will add it.
Bivouac: We have added the most common permitted bivouac locations along the trail. If you believe we are missing a popular permitted bivouac location along the trail, please email us the details (picture, water source, etc), and we will add it. Sometimes we won’t add new bivouac locations that have been suggested if they are not permitted by the local authorities, or we already have a bivouac location identified nearby.
Yes, you can add a rest day at any time. If you have created an itinerary with all of your accommodation locations (including a finish location) but now want to add a rest day along the way, we recommend following these steps;
Ensure the total number of days for your itinerary is correct (i.e includes your rest day). If it needs to increase, go to the ‘Trip Details’ drop-down at the top of the left-hand panel on the map page and increase the number of days
‘Slide’ the rest day back through your itinerary until it is assigned to the correct accommodation location. For example, if the total number of days for your itinerary is now 8 (7 hiking and 1 rest day) and you want to make day 5 a rest day, follow these steps;
Set your finish location in the correct spot (ie: checkered flag, accommodation or pick on map)
Click on your accommodation for night 6 and select night 7 from the drop-down
On the left-hand panel, day 7 will now appear as a rest day (only temporary)
Now click on your accommodation for night 5 and select night 6 from the drop-down
On the left-hand panel, day 6 will now appear as a rest day (only temporary), and it will be gone from day 7 as it has ‘slid’ back
Now click on your accommodation for night 4 and select night 5 from the drop-down
On the left-hand panel, day 5 will now appear as a rest day (hooray!), and it will be gone from day 6 as it has slid back
Note: If day 5 is not showing up as a rest day, see point 3 below
3. (Important!) If you had originally placed any route waypoints on or after your rest day, you’ll need to delete them and re-add them to ensure the trail stats for each day are correct. The number before the decimal on a route waypoint is the day they are assigned to. These do not update when you change the night you’re planning to stay at each accommodation location. After adding a rest day, you’ll be staying at each of the subsequent accommodation locations one day later than previously set, and therefore, they will have the wrong route waypoints between them.
For example, if you had previously added route waypoints between day 4 and day 5, they will have been assigned numbers 4.1, 4.2, 4.3, etc, to direct the day 5 route. Because day 5 is now a rest day and day 6 is when you’ll be hiking along this section, we need to first delete these route waypoints and add new ones (i.e. 5.1, 5.2, 5.3, etc) in their place.
You’ll need to repeat this process for all subsequent days after your new rest day to ensure the trail stats are correct
If you’re having trouble, email us (info@thehiking.club) your itinerary description/name and where you’re planning a rest day, and we’ll help you add it.
You can make as many changes as you want to your start and finish locations.
Either click on a new accommodation or checkered flag and select ‘start location’ or, if you are using the ‘pick on the map’ feature, select “change” under Start/Finish location from the side panel and click a new position on the map.

Sometimes when you are trying to include different trails in your plan, it seems like the app is trying to avoid it by sending the path to double back on itself to get to the main trail. In these cases, try;
Moving your route waypoint pin further along the trail you want to select, or
Adding more route waypoints to the map (in the sequence of your hiking direction)
If neither of the above work, email us at info@thehiking.club with a screenshot of the trail you can’t select and we’ll fix it up for you.
Trails: We have included the main trail and all of the popular variants noted by the local trail authority and/or The Hiking Club community for the hike you have purchased. If the trail you want to take is not one of the popular alternative routes we have shown in blue, try switching on the ‘other’ trails in the bottom right panel. We have some additional routes available here for you to select. If the route you want to take still isn’t shown, please get in touch with us and share details of this trail - we’ll advise if/when it can be added to the map.
Transport: We have included all of the transport that operates along or near the trail, as well as some additional transport connections to skip entire sections/mountain passes. If there is additional transport you want to include, please get in touch with us and share details - we’ll advise if it can be added to the map.
There are two ways to see details about the trails and transport you’ve selected;
Before adding your accommodation locations to the map, you can click on the main, alternative and transport routes to see details about them.
After you’ve added accommodation to your itinerary, click on ‘Route’ in the left hand panel for each day and then the magnifying glass against each row, it will highlight the route and a pop-up will display with a description and images of that section.
Sometimes when you are trying to include transport in your plan, it seems like the app is trying to avoid it by sending the path to double back on itself to get to the main trail. In these cases, try;
Moving your route waypoint pin further along the trail you want to select, or
Adding more route waypoints to the map (in the sequence of your hiking direction)
If neither of the above work, email us at info@thehiking.club with a screenshot of the transport you can’t select and we’ll fix it up for you.
Click on ‘Route’ in the left-hand panel for the day you’ve added transport and look for the row(s) with bus, train, and/or cable car symbols which means these transport types are included in your route.
Click on the magnifying glass at the end of these rows, and it will highlight the route. A pop-up will display a description and images of that section.
A few things you can check to make sure the itinerary is building correctly;
Zoom in and check the path is following your planned route. For example, perhaps some transport has been included where you weren’t planning to take it, or, a different hiking trail (i.e main v. alternative),
Ensure the route waypoints between accommodation locations are the correct numbers. For example, route waypoints 1.1 is for hiking day 2 and should be between accommodation location 1 and accommodation location 2 and route waypoint 3.2 is for hiking day 4 should be between accommodation locations 3 and 4. Sometimes, if you change your accommodation locations after adding route waypoints, they can end up being being assigned to the wrong days and cause the trail stats to be wrong. Simple click on the incorrect route waypoints to remove them and add new ones if necessary
Ensure the route waypoints in the correct order. For example, if the waypoint numbers for your path appears to be 1 > 1.3 > 1.2 > 1.1 > 2, it is incorrect and will cause your trail stats to be higher. To resolve this issue, simply click on the route waypoints to remove them and re-add them in the correct order if necessary
Try to refresh your page
Try to click back to the homepage and then back into the itinerary.
If that doesn’t work, email us with the issue and we’ll look into it.
FAQ for customers prior to November 2023
If you used our previous form-based itinerary builder and received an itinerary PDF, there may be small differences in your hiking stats as we've done a big review and update to our trail stats database. Bigger differences (more than 20 min per day) should only be triggered by choosing a route to your accommodation each day vs the town/location in the form based itinerary building process. If you are seeing big unexplained differences, please let us know and we’ll investigate.
No worries - just email us and we'll create your itinerary within the app using the original plan you'd finalised using the form based itinerary builder.
No. Our app is focused on the planning process only at this stage. We'll still produce the same format .kml file to use with Organic Maps, and also a .gpx file you can use it with your preferred navigation app.